Austin Seven Differential Adjustments - Late Model
The following assumes all components and bearing, including the diff centre bushes are in a serviceable condition. It is taken largely from the Bill Williams book Austin Seven Specials - with my comments added in places relating my experiences.
The Process
Since the drag from the oil seals will upset final adjustment of the pinion and crown wheel, the rear hubs should not be refitted to the axle shafts until later.
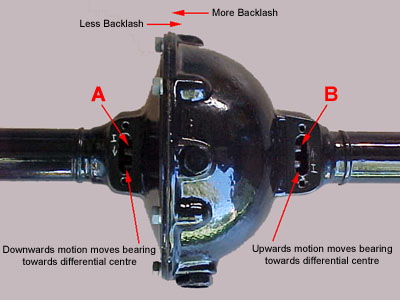
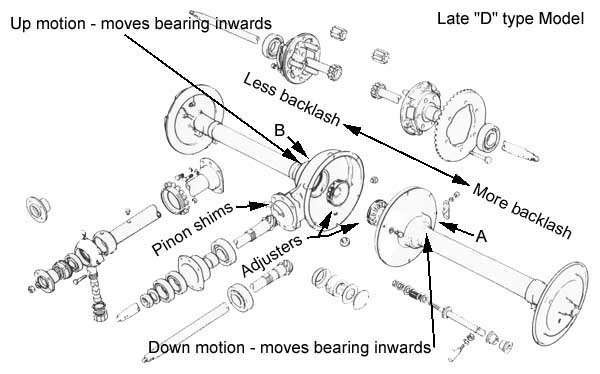
The above photograph shows the two adjusters used to correctly position the crown gear relative to the pinion gear
(as viewed from the rear of the differential)
photograph by Bruce White
Adjustment of the crown wheel and pinion is carried out as follows:
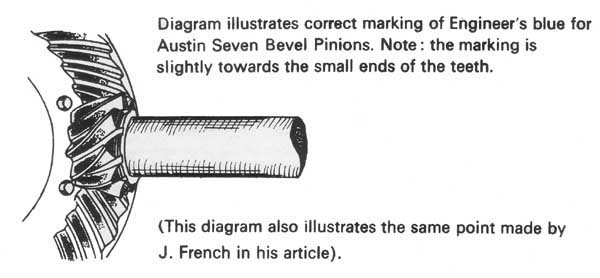
Fit the torque tube and pinion using the original shim or in the case of an unknown crown and pinion configuration, start by not using a shim. If using shims they MUST be a suitable metal shim and NOT paper. Now bring the crown wheel up to the pinion as follows. The nearside serrated adjusting ring (marked A above), should be levered round by pulling the serrations downwards, until it bears tightly against the inner bearing. The pinion should then be checked by slowly rotating the drive flange. Continue moving the crown in until the pinion is obviously too tight, the adjuster ring should be taken back about two serrations. The offside adjuster (marked B above) must now be tightened by levering upwards in a similar manner in order to move the crown back away from the pinion. The effect of this process is to move the crown wheel assembly back and forth in relation to the pinion as shown above. Once a suitable position is found, the crown and pinion mating can be checked using standard methods such as blueing etc. it is recommended to have the pinion adjusted as to run slightly towards the small end of the pinion gear (see figure below). If further pinion adjusting is required, back the crown assembly away from the pinion using the adjusters as described above. Remove the torque tube and pinion and repeat the process using shims until you are happy with the pinion position.
As shown on page 159 of the Austin Seven Companion
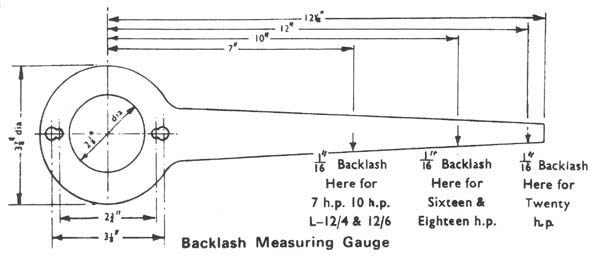
The final backlash (free play) can now be set-up. The pinion should now be turned with a rocking action, since there is usually one place in one revolution which feels tighter. This particular point is where final adjustment should be made, otherwise the clearance will diminish as the axle heats up under load, causing excessive wear of the crown wheel and pinion. This clearance should be a minimum of .005"at its tightest point. To obtain this clearance as accurately as possible, make up a simple test rig as shown below.
As shown on page 159 of the Austin Seven Companion
A total movement of 1/16" will represent a .005" backlash on the crown wheel and pinion gears. It is essential that this adjustment be made with the teeth clean and dry. It is also important to make sure it is only the crown and pinion free play you are measuring. This is best checked by putting a suitable object up the diff drain hole and ensuring the crown is "locked" or held well this measurement is made. After the final adjustments, the adjusting rings should be hand tight. In no circumstances should they be hammered tight, or the bearing will overheat under load. It will be noticed that the locating peg in the adjusting ring locking plate is offset. This is so that the plate may be reversed in order to mate with the position of the serrations. If the locking plates will not fit flush with the axle casings, they may have to be moved slightly, but they must never be loose. The rear hubs may now be refitted. Several factory tools were made for setting up Austin Seven differentials. Other sections on this site cover related differential topics. Also please read the excellent comments by Ian Moorcraft and others in the Discussion Forum on this topic.